I wish to pose a question to anyone who uses Windows 10 and has children. Do you have separate Microsoft accounts for your children? If not, were you aware that by doing so, you could use the Microsoft Family Features to limit their screen time, keep an eye on their online purchases and have the option of setting content filters?

Microsoft has very kindly given me a briefing and demonstrated these features to me. Known as ‘family features,’ they’ve been designed with the aim of ensuring that young people can explore the digital world safely and develop good online habits.
It’s all too easy to have the one desktop PC in a family home and have everyone leap on to it whenever they need it, whether it be the kids doing homework and playing games or parents working from home and doing admin. I am sure many households operate like this, but with a little preparation, you can set up your children with their own accounts. Not only will this keep them that bit safer online, but it will be harder for them to mess up any documents or data you have saved in your Microsoft account and Onedrive!
I’ve outlined below a step by step guide for setting your children up with their own Microsoft account and how to adjust the various settings. The one bit of advice I would give you is to have a serious play around with the settings.
It’s easy to set these things up with the best intentions and walk away from them, never to look at them again. You need to be familiar with them and you should also review them from time to time as Windows updates can change things and you will want to make sure they are still appropriate as your kids get older.
Microsoft family settings, step by step guide
Create a child’s account
As mentioned above, your first step will be to add your child’s account (the email address they use to access Microsoft services) to your parent Microsoft account.
To do this, go to: Start > Settings > Accounts > Add a Family Member
You should then select ‘add a child’. A pop-up box will appear. Enter their email address into the pop-up.
If your child does not have a Microsoft email account, you can easily set one up. There is an option saying ‘The person I want to add doesn’t have an email address’. Select this option and follow the instructions.
An Invitation to link the accounts will be sent to your child’s email address. They should accept the invitation and then select ‘sign in and join’. Be advised the account window will show them as ‘pending’ until they accept the invitation.
Managing family settings
When everyone in your family has an account, you can personalise the settings for your children and make them age appropriate.
Go to: Start > Settings > Accounts > Family & Other Users
You should then click the ‘manage family settings online’ link.
This will open an activity page where you will see all of your family members listed. For those who have children’s accounts, you can manage their screen time, purchase limits and set content filters
Managing screen time
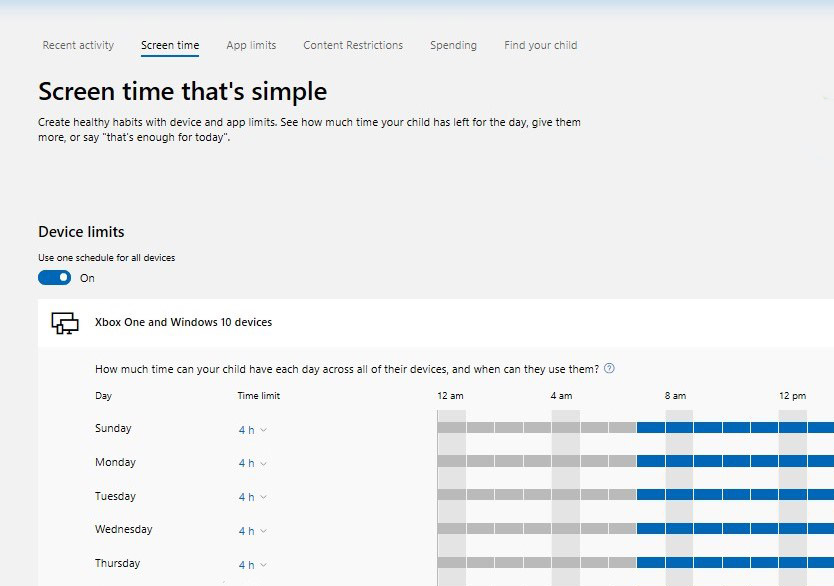
You can adjust how much time your child spends online, maybe giving them more at weekends than week days. Simply click ‘screen time’ and slide the button for ‘set limits for when my children can use devices’ to ‘on’.
You will then be able to use the ‘hours allowed’ setting to set limits for hour long your child can spend online and at what times of day (IE you could give them half an hour on Saturday morning and an hour on Saturday evening). Should you wish to, you can also block access to a device for an entire day (or days!).
It is also possible to manage which websites your child can access. Simply click the ‘web browsing’link and enter the URL for the web pages you either want to block or allow.
Content restrictions
The imaginatively titled ‘content restrictions’ page will enable you to block websites, set age limits for apps, games and other media. You can also set up your child’s account so they need approval for any purchases made in the Microsoft store.
It’s very simple. There are a series of toggles that you set as you see fit.
Purchase limits
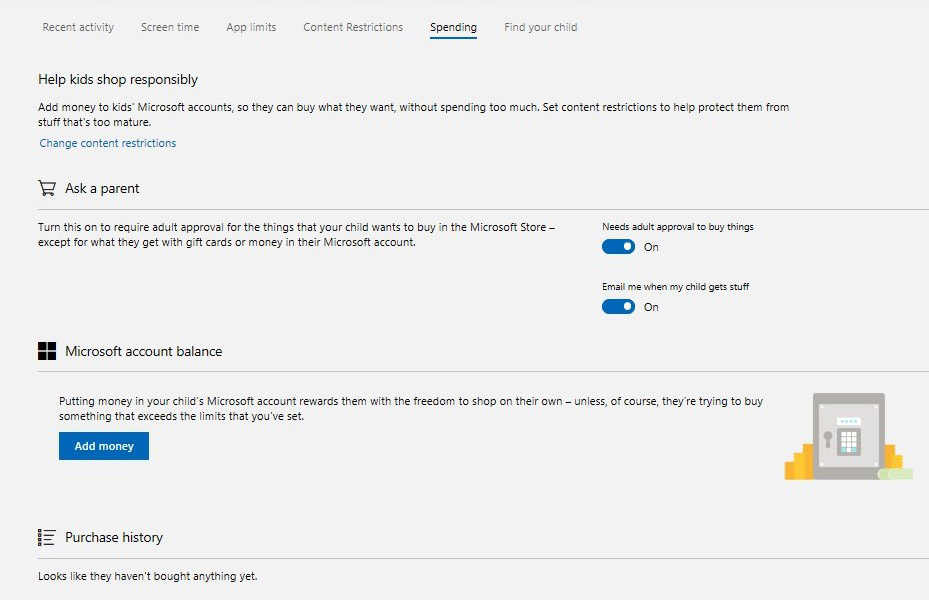
You will see the account has a ‘spending’ tab. You can add money to your child’s account so they can spend money in the Microsoft store buying apps, games, films and so on. So long as you have the content restrictions set up properly (see above) they will be unable to buy anything deemed age inappropriate.
To add funds, you should click ‘add money’, enter an amount and complete the transaction. It’s worth noting you can also review your child’s purchase history on this page.
Other useful features and tools
Activity page
The ‘activity’ page is very useful. Using this page, you can view everything that your child is accessing on their Microsoft account. Just ensure you have ‘activity reporting’ switched on.
The report will show the apps, games and web pages that your child has been visiting. It will also keep a record of the amount of time they have spent on their device.
Microsoft Launcher
The Microsoft Launcher app can be downloaded to Android devices (it can’t be used with iOS devices). If you add this to your Android phone and any devices your family use, you can set app limits, check on the device’s location and get reports about app activity while on the move.
Further information
You may find this blog post useful, which I wrote about the family controls on the Xbox. It’s very similar (Xbox and Microsoft being part of the same group of companies) but it is focused on the games console.
In the weeks to come I am also planning to write a blog post about the Microsoft Surface range of products. Do keep an eye on the blog and my social media channels for more.


1 thought on “Microsoft Family Features on Windows 10: Step by step guide for parents”
Thank you very much to the writer for sharing the methods with detailed analysis and step-by-step instructions